15 DIY Fall Wall Art Projects for Every Skill Level
Introduction
As the leaves start to change and the air grows crisp, there’s no better time to infuse your home with the cozy warmth of autumn. What better way to do that than by creating your own fall-inspired wall art? Whether you’re a seasoned crafter or just starting out, we’ve got 15 fantastic DIY projects that will help you bring the beauty of the season indoors. Let’s dive in and get creative!
Check out these fall decor products you might like.

1. Leaf Pressing Wall Art
Skill Level: Beginner
Remember pressing leaves in books as a kid? Let’s take that childhood pastime to the next level! This project is perfect for a family outing or a solo nature walk.
You’ll need:
- Colorful fall leaves
- Heavy books
- White cardstock or watercolor paper
- Picture frames
First, collect a variety of colorful leaves on your next autumn stroll. Place them between sheets of paper in a heavy book and let them dry for about a week. Once they’re pressed flat, arrange them on white cardstock or watercolor paper. Play with different patterns – maybe a circle of leaves or a leaf “bouquet.” Once you’re happy with the arrangement, carefully glue the leaves in place. Pop your creation in a frame, and voila! You’ve got a piece of autumn to enjoy all year round.

2. Pumpkin String Wall Art
Skill Level: Intermediate
This project combines the rustic charm of wooden boards with the delicate intricacy of string art.
You’ll need:
- A wooden board (about 12×12 inches)
- Small nails
- Orange embroidery thread or thin yarn
- Hammer
- Pumpkin template (you can draw this yourself or print one)
Start by staining or painting your wooden board if desired. Then, trace or print a simple pumpkin shape onto the board. Tap small nails along the outline of the pumpkin, spacing them about 1/2 inch apart. Once all the nails are in place, start wrapping your orange thread around the nails, crisscrossing back and forth to fill in the pumpkin shape. Add a bit of green at the top for the stem, and you’ve got a modern twist on fall decor!

3. Autumn Watercolor Wreath Wall Art
Skill Level: Beginner to Intermediate
Even if you’re not confident in your painting skills, this project is forgiving and fun.
You’ll need:
- Watercolor paper
- Watercolor paints in fall colors
- Paintbrushes
- Black fine-tip marker
Start by lightly sketching a circle on your watercolor paper. Then, using fall-colored paints, create loose, organic shapes around the circle to form leaves and berries. Don’t worry about being too precise – the beauty of watercolor is in its flowing, natural look. Once the paint is dry, use your black marker to add details like leaf veins or berry stems. The result is a whimsical, colorful wreath that captures the essence of fall.

4. Painted Wooden Slices
Skill Level: Beginner
This project is perfect for those who love a more natural, rustic look.
You’ll need:
- Wood slices (available at craft stores or cut from a fallen branch)
- Acrylic paints
- Paintbrushes
- Twine or ribbon
Sand your wood slices if they’re rough, then let your creativity flow! Paint fall scenes, abstract designs, or simple words like “autumn” or “grateful.” You could create a set with different fall symbols – a pumpkin, a leaf, an acorn. Once the paint is dry, attach a loop of twine or ribbon to the back of each slice. Hang them individually or group them together for a charming fall display.

5. Fall Foliage Canvas Wall Art
Skill Level: Intermediate
This project creates a stunning, textured piece of art that looks more complex than it actually is.
You’ll need:
- Canvas
- Acrylic paints in fall colors
- Modeling paste
- Palette knife
- Paintbrushes
Start by painting your canvas with a background color – perhaps a soft sky blue or warm sunset orange. Once dry, use modeling paste and a palette knife to create raised areas in the shape of tree branches. Let this dry completely. Then, using fall-colored paints and a dabbing technique with your brush, create leaves all over the branches and canvas. The raised branches will give your painting a beautiful 3D effect.

6. Autumn Quote Calligraphy Wall Art
Skill Level: Beginner to Intermediate
Words can be just as beautiful as images, especially when crafted with care.
You’ll need:
- Calligraphy pens or brush markers
- Nice paper or canvas
- Your favorite fall quote
Choose a quote that resonates with you – perhaps “Autumn shows us how beautiful it is to let things go” or “Fall breeze, autumn leaves.” Practice your lettering a few times on scrap paper. When you’re ready, carefully write out your quote on your chosen background. Don’t worry if it’s not perfect – a slightly imperfect, handmade look adds charm. Frame your finished piece or hang it as is for a personal touch to your fall decor.

7. Fall Leaf Mason Jar Lanterns
Skill Level: Beginner
These charming lanterns bring a warm glow to any room.
You’ll need:
- Mason jars
- Mod Podge
- Artificial fall leaves
- Tea lights (battery-operated for safety)
- Twine
Clean your mason jars thoroughly. Apply a thin layer of Mod Podge to the outside of the jar, then carefully place artificial leaves onto the sticky surface. Brush another layer of Mod Podge over the leaves to seal them. Once dry, tie a bit of twine around the neck of the jar for a rustic touch. Pop in a battery-operated tea light, and you’ve got a beautiful, flickering fall decoration.

8. Autumn Tree Fingerprint Wall Art
Skill Level: Beginner
This is a fantastic project to do with kids, or for anyone who wants to embrace their playful side.
You’ll need:
- Canvas or heavy paper
- Acrylic paints in fall colors
- Black paint or marker for the tree trunk
Start by painting a simple tree trunk and branches with black paint or marker. Then, dip your fingertips into fall-colored paints and press them onto the canvas to create leaves. Use different colors and vary the density of your fingerprints to create a full, vibrant tree. This personal touch makes for a unique and meaningful piece of art.

9. Felt Fall Leaf Garland
Skill Level: Beginner to Intermediate
This cozy garland brings a touch of textile art to your walls.
You’ll need:
- Felt in various fall colors
- Scissors
- Thread and needle (or sewing machine)
- Twine
Cut leaf shapes out of your felt – you can freehand these or use a template. If you’re feeling ambitious, cut a few different types of leaves. Sew a line down the middle of each leaf to give it some structure and vein detailing. Then, sew your leaves onto a long piece of twine, spacing them as you like. Hang your garland across a mantel, down a staircase, or along a blank wall for an instant fall update.

10. Rustic Wood Slice Painting
Skill Level: Intermediate
This project combines the charm of natural wood with delicate painting.
You’ll need:
- Large wood slice (available at craft stores)
- Acrylic paints
- Fine paintbrushes
- Clear sealant
Sand your wood slice if needed, then sketch out a simple fall scene – perhaps a pumpkin patch, a bare tree against a sunset, or a cozy cabin in the woods. Use your acrylic paints to bring the scene to life, working slowly and building up layers of color. The natural grain of the wood will add beautiful texture to your painting. Once you’re happy with your scene and the paint is completely dry, spray with a clear sealant to protect your art.

11. Autumn Leaf Suncatchers
Skill Level: Beginner
Bring the colors of fall to your windows with these cheerful suncatchers.
You’ll need:
- Clear contact paper
- Tissue paper in fall colors
- Scissors
- Ribbon
Cut two identical leaf shapes out of contact paper. Remove the backing from one piece and stick it to a window, sticky side out. Cut or tear small pieces of tissue paper and stick them to the contact paper, overlapping colors to create a stained-glass effect. When you’re happy with the coverage, carefully place the second contact paper leaf on top, sealing in the tissue paper. Trim any excess and add a ribbon loop at the top. When the sun shines through, you’ll have a beautiful fall display.
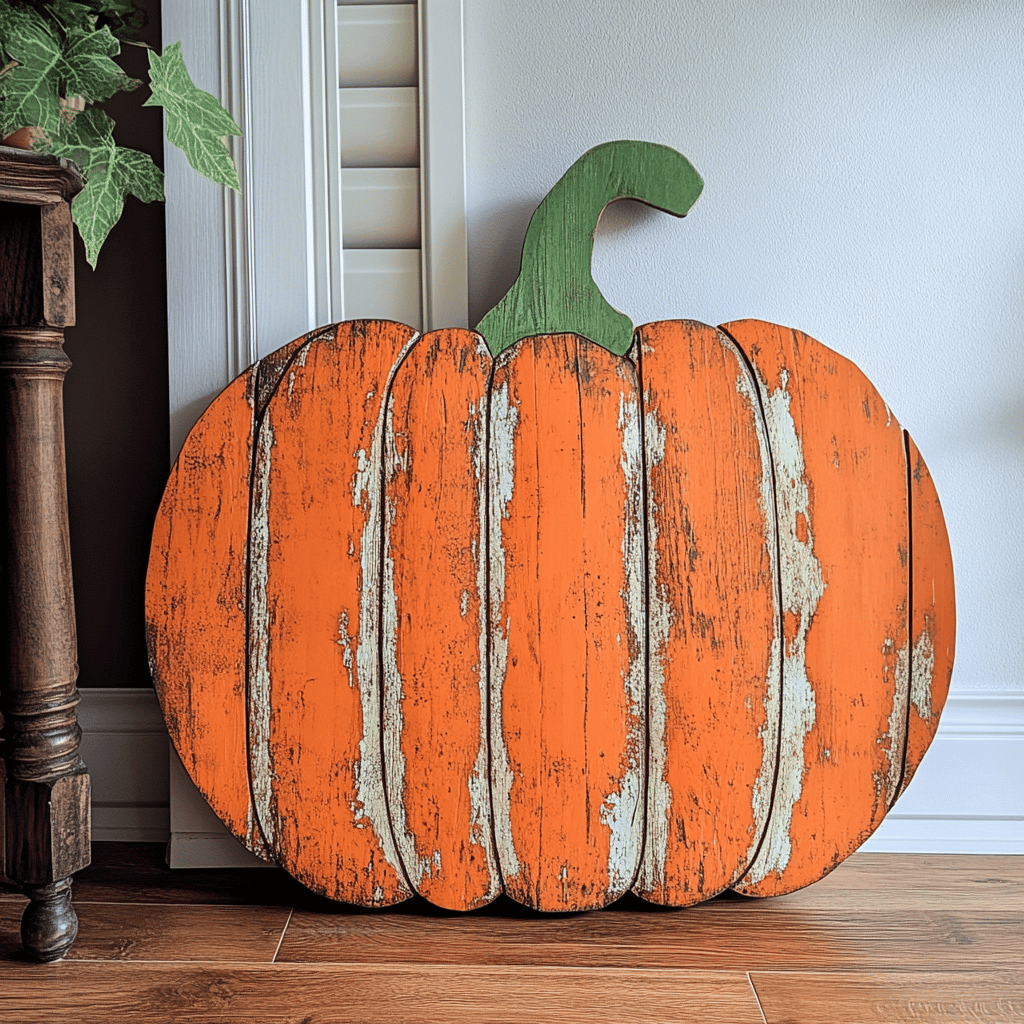
12. Wooden Pallet Pumpkin
Skill Level: Intermediate to Advanced
This larger project creates a statement piece perfect for outdoor or indoor display.
You’ll need:
- Wooden pallets
- Saw
- Sandpaper
- Orange paint or stain
- Green paint
- Twine
Disassemble your pallet and cut the boards into various lengths to form a pumpkin shape when arranged together. Sand all the pieces smooth. Arrange the boards in a pumpkin shape and secure them together from the back with two longer boards. Paint or stain the pumpkin orange, then add a green stem at the top. Wrap some twine around the stem for a finishing touch. This charming, rustic pumpkin will be a fall favorite year after year.

13. Fall Leaf Bowl
Skill Level: Intermediate
This delicate bowl brings the outside in with a touch of whimsy.
You’ll need:
- Artificial fall leaves
- Mod Podge
- A balloon
- Paintbrush
Blow up a balloon to the size you want your bowl to be. Cover the bottom half of the balloon with a layer of Mod Podge. Carefully place leaves onto the sticky surface, overlapping them slightly. Continue until you’ve covered the area you want for your bowl. Apply several more layers of Mod Podge over the leaves, allowing each layer to dry completely. Once fully dry, pop the balloon and carefully remove it from your leaf bowl. Use your creation as a unique centerpiece or to hold small items.

14. Autumn Leaf Fairy Lights
Skill Level: Beginner
Bring a warm glow to any room with this enchanting project.
You’ll need:
- String of LED fairy lights
- Artificial fall leaves
- Hot glue gun
This project is simple but stunning. Take your string of fairy lights and carefully hot glue an artificial leaf around each light. Vary the colors and types of leaves for a more natural look. When you plug in your lights, each bulb will glow through its leaf, creating a magical autumn ambiance. Drape your leaf lights along a mantel, around a mirror, or along a headboard for a cozy fall touch.

15. Fall-Themed Gallery Wall Art
Skill Level: Varies
This final project brings together many of the techniques we’ve explored, allowing you to create a stunning, personalized display.
You’ll need:
- Various sizes of frames
- A mix of materials for different projects (paints, leaves, photos, etc.)
- Nails and hammer or adhesive strips for hanging
The beauty of a gallery wall is that it can incorporate many different types of art. Create a few pieces using techniques from earlier projects – perhaps a leaf pressing, a watercolor, and a calligraphy quote. Add in some fall-themed photographs or prints. Arrange your pieces on the floor first to find a pleasing layout, then hang them on your wall. The result is a show-stopping fall display that’s uniquely yours.
Wrapping Up
Fall is a season that inspires creativity, with its rich colors and cozy atmosphere. These 15 DIY projects offer something for everyone, from quick and easy crafts to more involved artistic endeavors. The best part about DIY is that each piece you create carries a part of you – your creativity, your effort, and your love for the season.
Remember, the goal isn’t perfection, but enjoyment. Have fun with these projects, get your family or friends involved, and don’t be afraid to put your own spin on things. Your home will thank you for the personal, handcrafted touch that no store-bought decoration can match.
So grab some hot apple cider, put on your favorite sweater, and let’s get crafting! Your perfect fall oasis awaits, filled with art that’s as unique as you are. Happy autumn, and happy creating!
Love fall decor and DIYs, check out the articles below.


How to Incorporate Nature-Inspired Prints in Your Fall Decor
August 15, 2024 @ 1:02 pm
[…] 15 DIY Fall Wall Art Projects for Every Skill Level […]
Rustic Fall Wall Decor Ideas for a Cozy Farmhouse Look
August 21, 2024 @ 1:24 pm
[…] 15 DIY Fall Wall Art Projects for Every Skill Level […]
Creating a Cozy Fall Loft with Vintage-Industrial Style
September 22, 2024 @ 10:52 pm
[…] 15 DIY Fall Wall Art Projects for Every Skill Level […]
Best Way to Incorporate Nature-Inspired Prints in Your Fall Decor
November 6, 2025 @ 3:27 pm
[…] 15 DIY Fall Wall Art Projects for Every Skill Level […]