How to Create a Magical Winter Terrarium with Pinecones
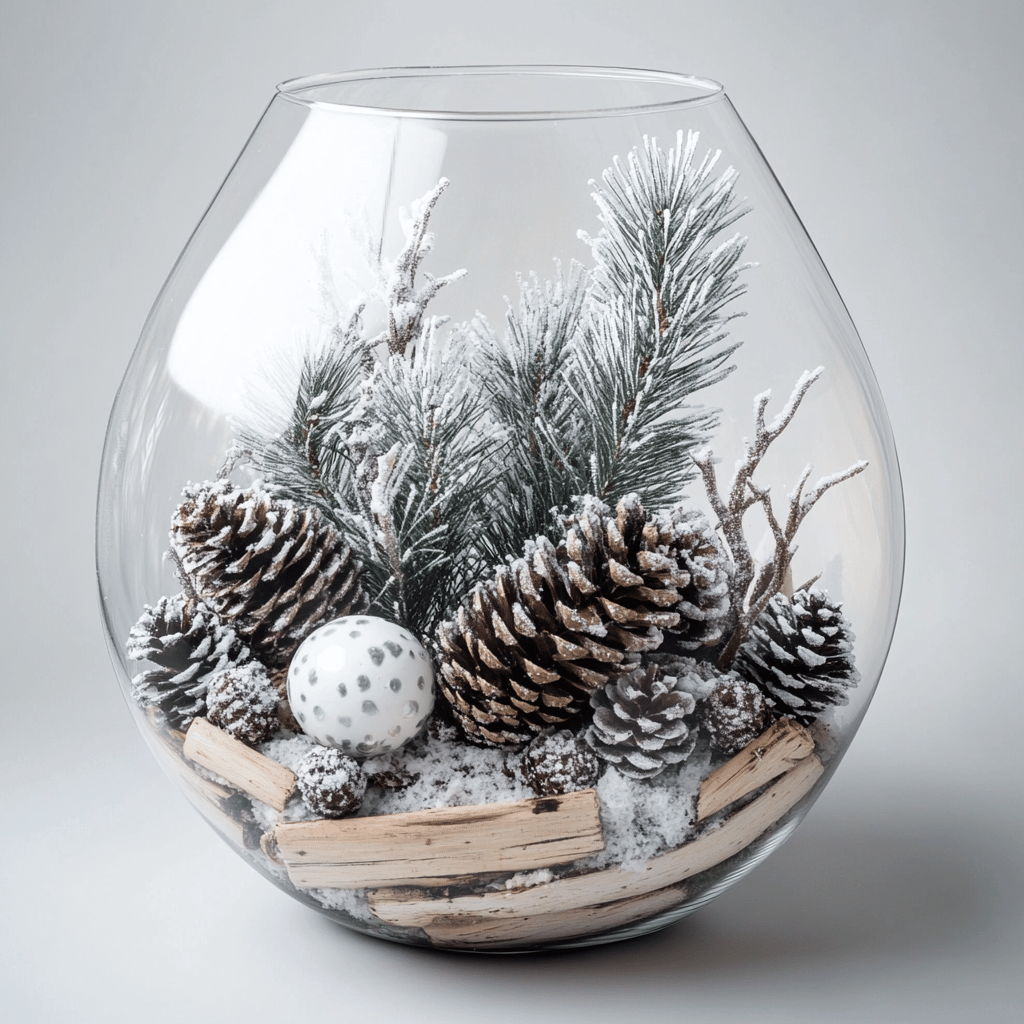
There’s something magical about bringing a piece of the winter wonderland indoors. After years of crafting various holiday decorations, I’ve discovered that winter terrariums with pinecones are one of my favorite ways to capture the season’s charm. Today, I’m excited to share my complete guide on creating these enchanting miniature winter landscapes that can brighten your home long after the holiday season ends.


Why Winter Terrariums with Pinecones?
I first stumbled upon this idea during a particularly long winter when I was looking for ways to keep my home feeling cozy and festive without the Christmas decorations. What started as a simple experiment has become one of my go-to winter decorating projects. These terrariums are incredibly versatile – they work perfectly as centerpieces, side table accents, or even as unique gifts.

Gathering Your Materials
Before we dive into the creation process, let’s talk about what you’ll need. I’ve found that having everything ready makes the process much more enjoyable. Here’s my must-have list:
- A large glass container (I prefer ones with wide openings)
- Various sizes of pinecones (small ones work best)
- Fresh or preserved moss
- Miniature artificial evergreen trees
- Small decorative elements (tiny winter animals, miniature benches)
- Artificial snow (optional)
- Small pebbles or aquarium gravel
- Activated charcoal (helps prevent mold)
- Basic potting soil
- Decorative elements like small twigs or bark pieces
- Battery-operated mini LED lights (optional)

Choosing the Perfect Container
In my experience, the container can make or break your winter terrarium. I prefer using clear glass containers with wide openings – they make arranging elements much easier. Some of my favorites include:
- Large apothecary jars
- Fish bowls
- Square glass containers
- Classic terrariums with removable lids
- Old candy jars
The size really depends on where you plan to display it. I typically use containers that are at least 8 inches in diameter to give myself enough room to create depth and interest.

Preparing Your Pinecones
This is a step I learned the hard way – you can’t just pick up pinecones from outside and pop them in your terrarium. Here’s my tried-and-true preparation process:
- Collect pinecones that are proportionate to your container
- Soak them in warm water with a splash of white vinegar for 30 minutes
- Let them dry completely (this usually takes 24-48 hours)
- Bake them at 200°F for an hour to eliminate any tiny creatures
- Let them cool completely before using

Creating Your Winter Wonderland: A Step-by-Step Guide
Now comes the fun part! Here’s how I create these magical miniature landscapes:
Step 1: Laying the Foundation
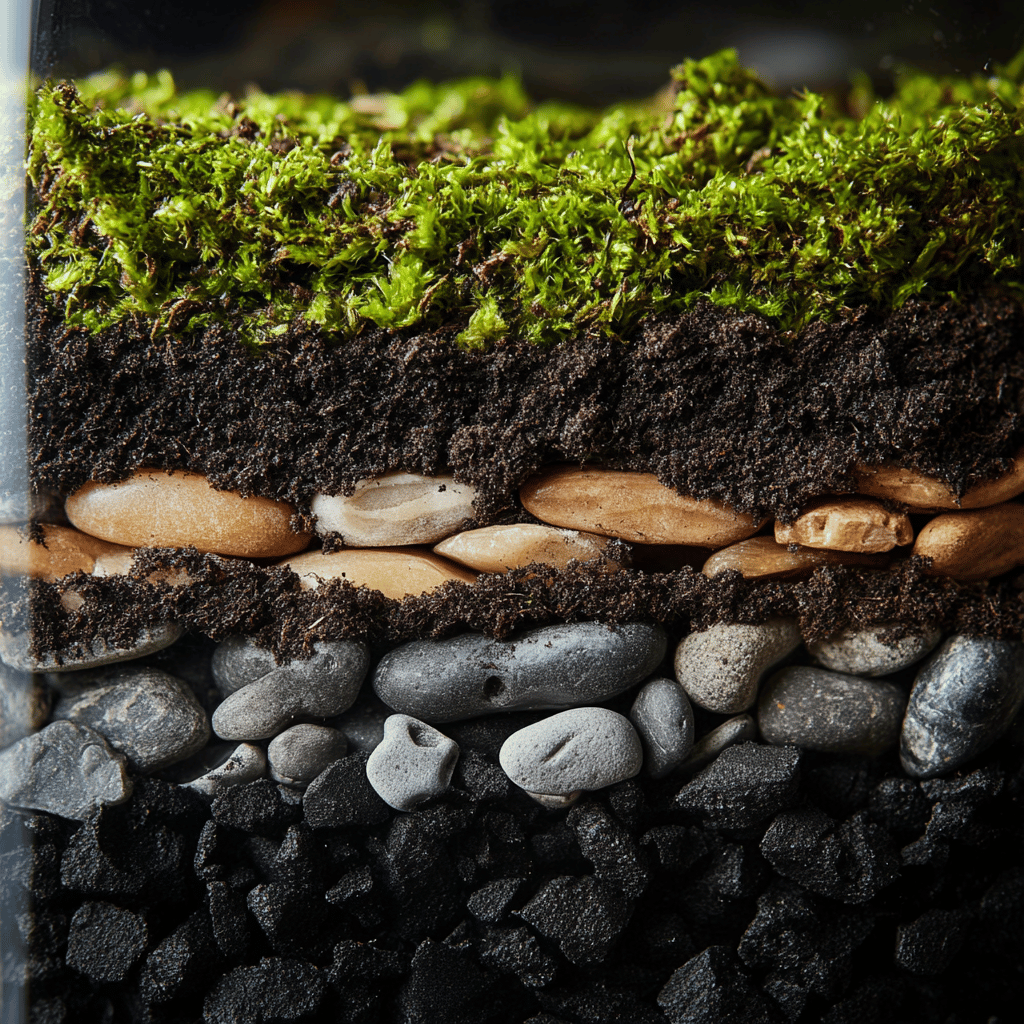
I start with a layer of small pebbles or aquarium gravel (about 1-2 inches deep). This provides drainage and helps prevent moisture buildup. On top of this, I sprinkle a thin layer of activated charcoal.
Step 2: Adding the Soil Layer
Next, I add a layer of basic potting soil. You don’t need much – just enough to anchor your decorative elements and give the moss something to grip onto. I usually add about an inch, creating small hills and valleys for interest.
Step 3: Creating the Base Landscape
This is where the magic begins. I cover the soil with moss, creating a lush, green carpet. I love using different types of moss to create varying textures and heights. Some patches I leave higher, others I press down to create natural-looking variations.
Step 4: Adding Your Main Elements
Now it’s time for the pinecones. I usually start with the largest ones first, placing them strategically to create focal points. I often position them slightly tilted or partially buried in the moss for a more natural look. Then I add the smaller pinecones around them, creating little groupings that look like they’ve naturally fallen from trees.
Step 5: Installing the Trees
Miniature artificial evergreens add height and that quintessential winter forest feel. I place these behind the pinecones, creating depth and perspective. The key is to vary their heights and angles slightly – nature isn’t perfectly symmetrical!
Step 6: Adding the Details
This is my favorite part! I add tiny woodland creatures, perhaps a small bench, or even a miniature lantern. Sometimes I’ll include small branches or bark pieces to create fallen logs. The key is to not overcrowd – less is often more.
Step 7: The Finishing Touches
If I’m going for a snowy look, I’ll lightly dust some artificial snow over certain areas. I particularly love how it looks on the pinecones and tree branches. If I’m using LED lights, I’ll carefully weave them through the scene, hiding the battery pack behind larger elements.

Maintaining Your Winter Terrarium
These terrariums are relatively low-maintenance, but there are a few things I do to keep them looking fresh:
- Dust regularly with a small, soft brush
- Keep away from direct sunlight to prevent the moss from drying out
- If using real moss, mist very lightly every few weeks
- Replace any elements that start to look worn
- Check periodically for any signs of mold (though this is rare if you’ve used the charcoal layer)

Creative Variations to Try
Over the years, I’ve experimented with different themes for these terrariums. Here are some of my favorite variations:
- Nordic Winter: Use white-tipped pinecones and add small wooden elements
- Woodland Night: Include battery-operated lights and focus on creating a magical evening scene
- Alpine Adventure: Add small crystals or rocks to create a mountain landscape
- Forest Floor: Focus on creating a dense woodland scene with lots of moss and tiny mushrooms

Common Mistakes to Avoid
Through trial and error, I’ve learned what not to do:
- Don’t overcrowd your terrarium – leave some open spaces
- Avoid using too many different types of decorative elements
- Don’t skip the drainage layer – it’s essential for longevity
- Don’t place the terrarium in direct sunlight or near heating vents
- Avoid using elements that are too large for your container

Why I Love This Project
What makes these winter terrariums so special is their ability to bring joy throughout the entire season. Unlike holiday-specific decorations, these can stay out from early winter through the last frost. They create a perfect conversation piece and add a touch of natural beauty to any room.
Every time I create one of these terrariums, it’s different from the last. That’s what makes them so engaging – they’re like tiny works of art that you can continually adjust and perfect. Plus, they’re a wonderful way to stay connected to nature during those long winter months when we’re mostly indoors.

Final Thoughts
Creating a winter terrarium with pinecones is more than just a decorating project – it’s a way to bring a bit of winter magic into your home. Whether you’re an experienced crafter or just starting out, these miniature landscapes offer endless possibilities for creativity and personalization.
Remember, there’s no “perfect” way to create these terrariums. What matters most is that you enjoy the process and create something that brings you joy throughout the winter season. So gather your materials, let your creativity flow, and watch as your own miniature winter wonderland comes to life!
If you love winter decorating as much as I do, check out these other articles I think you might like.
15 Ways to Decorate with Pinecones After Christmas
How to Create a Magical Frosted Pinecone Centerpiece
Creating Magical Winter Window Displays with Pinecones
How to Create Stunning Hurricane Vase Displays with Pinecones
How to Create a Stunning Winter Pinecone Wreath
How to Create a Pinecone Place Card Holder for Your Table
How to Create a Winter Mantel Display with Pinecones
How to Create Stunning Pinecone Garlands
How to Create Winter Displays With Pinecones & Apothecary Jars
How to Create Winter Coffee Table Arrangements with Pinecones
Pinecone Cabinet Pulls: Transform with Natural Winter Charm
Creating Cozy Winter Magic with Pinecone Basket Displays


